

This document explains how to implement Microsoft Single Sign-On (SSO) authentication when embedding your application inside an iFrame. Below is a diagram illustrating the authentication flow:
Note: This implementation uses Microsoft SSO for demonstration purposes only. The same authentication flow can be applied using any SSO provider of your choice, such as Google, Okta, Auth0, or your own custom SSO solution.
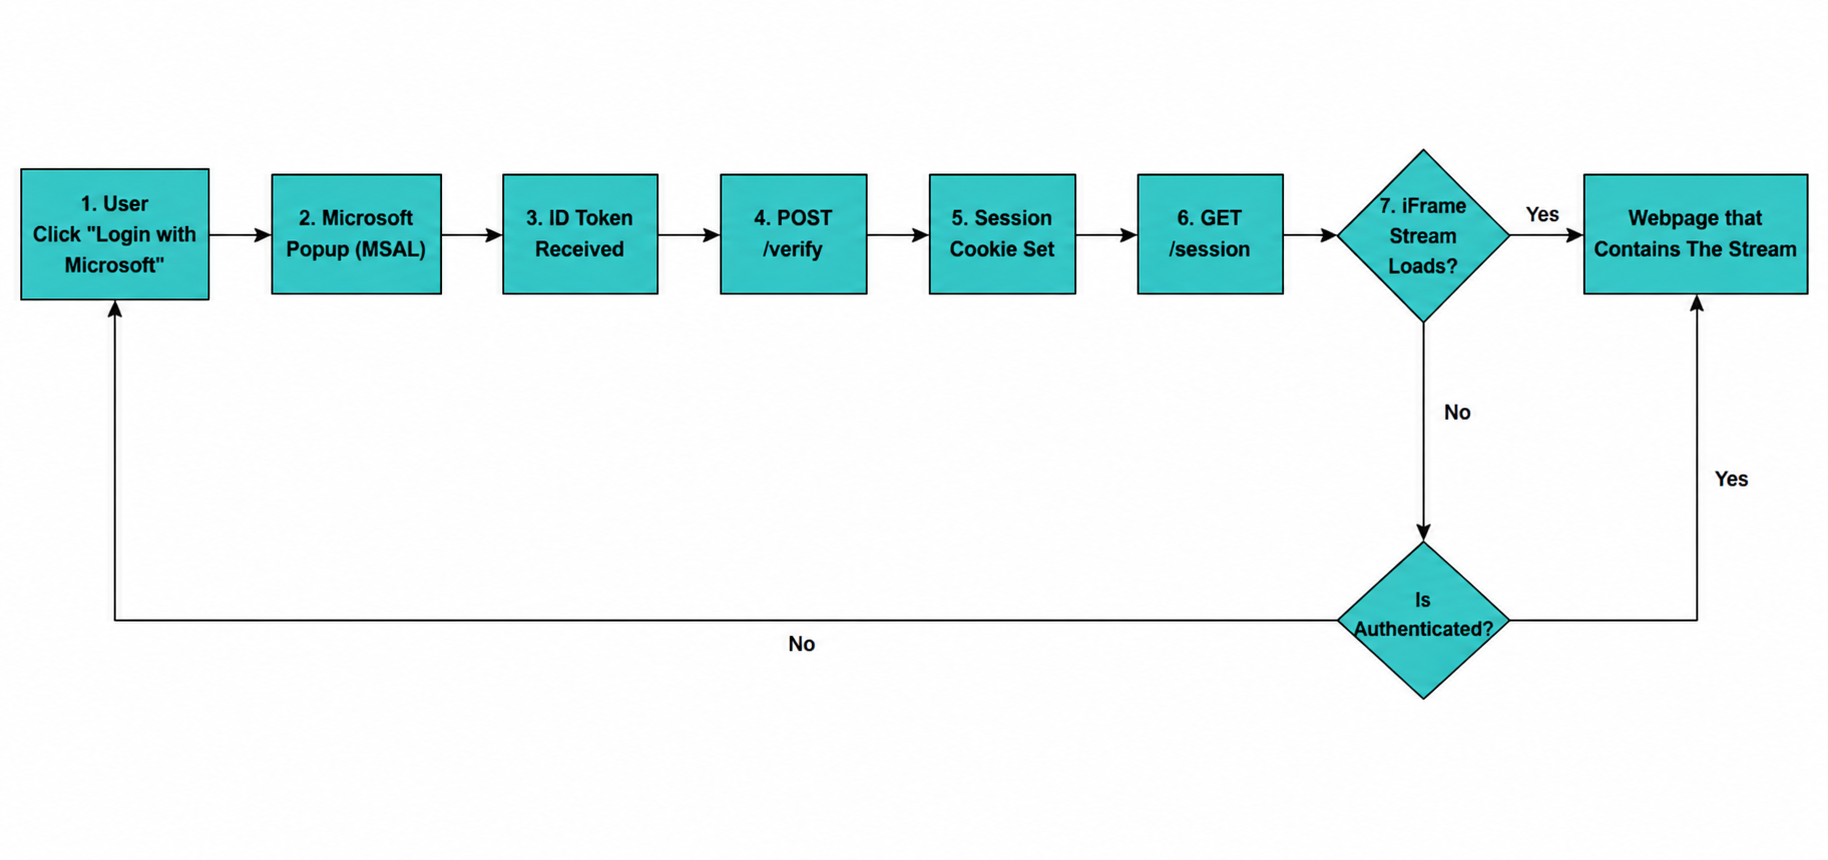
The logic is structured as follows:
-
The user lands on the page and clicks Login with Microsoft
-
A Microsoft login popup appears via the MSAL library
-
On successful sign-in, Microsoft returns an ID token
-
The ID token is sent to
/verify, the backend validates it and sets a secure session cookie -
The page calls
/sessionto confirm authentication status -
If authenticated, the iFrame stream is displayed and the welcome message is shown
-
On logout,
/logoutis called, the session is cleared, and the iFrame is hidden
Video Preview
Prerequisites
Before you begin, you need a registered application in the Microsoft Entra Admin Center:
-
Go to entra.microsoft.com → Microsoft Entra ID → App Registrations → New Registration
-
Set the Redirect URI to your domain (e.g.
https://yourdomain.com/) -
Under Authentication, enable ID tokens under Implicit grant
-
Copy the Application (client) ID — you will need this in Step 1
Environment Setup
Before running the server, create a .env file in your project root with the following variables:
MS_CLIENT_ID=your-microsoft-app-client-id
JWT_SECRET=your-strong-random-secret
PORT=3000
NODE_ENV=production
|
Variable |
Description |
|---|---|
|
|
The Application (client) ID from your Microsoft App Registration |
|
|
A long random string used to sign the session JWT, keep this secret |
|
|
The port your Express server will listen on |
|
|
Set to |
Important: Never commit your
.envfile to version control. Add it to your.gitignore.
Follow the steps below:
Step 1. Create the Login Page
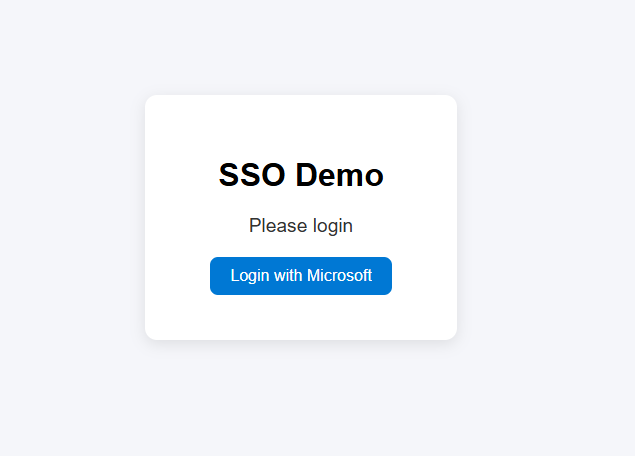
Create your main HTML page. It loads the MSAL library from CDN and references your client-side script. The CLIENT_ID from your Microsoft App Registration is injected by the server at render time so it is available to your JavaScript.
<!DOCTYPE html>
<html lang="en">
<head>
    <meta charset="UTF-8" />
    <title>SSO Demo</title>
    <link rel="stylesheet" href="/styles.css">
    <script src="https://alcdn.msauth.net/browser/2.37.0/js/msal-browser.min.js"></script>
    <script>
        const CLIENT_ID = "<%= clientId %>";
    </script>
    <script defer src="/script.js"></script>
</head>
<body>
<div class="container">
    <h1>SSO Demo</h1>
    <div id="userInfo">Please login</div>
    <button id="loginBtn">Login with Microsoft</button>
    <button id="logoutBtn">Logout</button>
</div>
</body>
</html>
Note:
<%= clientId %>is a server-side template expression. The server replaces it with your real Microsoft Client ID before sending the page to the browser.
Step 2. Add the iFrame to Your Stream Page
Add an <iframe> element to the page where the stream should appear. Keep it hidden by default — show it only after /session confirms the user is authenticated.
<iframe
    id="appFrame"
    style="display:none; width:100%; height:100vh; border:none;"
    allowfullscreen>
</iframe>
Define the stream URL using the username, app name, and config name provided by Eagle 3D Streaming:
const IFRAME_SRC = `https://connector.eagle3dstreaming.com/v5/USERNAME/APPNAME/CONFIGNAME`;
Replace USERNAME, APPNAME, and CONFIGNAME with your values from the Eagle 3D Streaming control panel.
Step 3. Initialise MSAL in Your Script
In your script.js, set up the MSAL instance using the CLIENT_ID that was injected into the page. Place this at the very top of script.js, before any button handlers or other logic — MSAL must be initialised before it can be called.
const msalConfig = {
    auth: {
        clientId: CLIENT_ID,
        authority: "https://login.microsoftonline.com/common",
        redirectUri: window.location.origin + "/",
    },
};

const msalInstance = new msal.PublicClientApplication(msalConfig);
The authority is set to common so users from any Microsoft tenant or personal Microsoft account can sign in. If you want to restrict to a specific organisation, replace common with your your Microsoft Tenant ID.
Step 4. Implement /verify — Validate Token & Create Session
Where it is used: This is the first API call you make immediately after a successful Microsoft login. When the user clicks Login with Microsoft and completes the popup, MSAL returns an ID token. At this point your client code has proof that Microsoft authenticated the user, but your own backend does not know about it yet. You call /verify to hand that token to your server, which cryptographically validates it and creates a trusted server-side session. Without this step, anyone could pass a fake token and gain access, the server-side validation is what makes the authentication secure.
Once /verify succeeds, the browser automatically holds a session cookie. All subsequent API calls (/session, /logout) use this cookie to identify the user, you do not need to pass the token again.
POST /verify — Server Implementation
// Verify Microsoft ID token and create session cookie
app.post("/verify", async (req, res) => {
    const { token } = req.body;
    if (!token) return res.status(400).json({ error: "Missing token" });
    try {
        // Decode token header and payload
        const decoded = jwt.decode(token, { complete: true });
        const tenantId = decoded.payload.tid; // or your tenant ID
        const discoveryUrl = `https://login.microsoftonline.com/${tenantId}/v2.0/.well-known/openid-configuration`;
// 1️⃣ Fetch OpenID config
        const { data: openidConfig } = await axios.get(discoveryUrl);
// 2️⃣ Get JWKs URI
        const jwksUri = openidConfig.jwks_uri;
// 3️⃣ Fetch keys
        const { data: jwks } = await axios.get(jwksUri);
// 4️⃣ Find key
        const key = jwks.keys.find(k => k.kid === decoded.header.kid);
        if (!key) return res.status(401).json({ error: "Key not found" });
// 5️⃣ Convert JWK to PEM and verify
        const pubKey = jwkToPem(key);
        const verified = jwt.verify(token, pubKey, { algorithms: ["RS256"], clockTolerance: 5 });
        // Verify audience
        if (verified.aud !== process.env.MS_CLIENT_ID)
            return res.status(401).json({ error: "Invalid audience" });
        // Create app session cookie
        const appSession = jwt.sign(
            { email: verified.preferred_username, name: verified.name },
            process.env.JWT_SECRET,
            { expiresIn: "1h" }
        );
        res.cookie("app_session", appSession, {
            httpOnly: true,
            secure: process.env.NODE_ENV === "production",
            sameSite: "lax",
        });
        res.json({ message: "Token verified", user: verified });
    } catch (err) {
        console.error(err);
        res.status(401).json({ error: "Token verification failed" });
    }
});
POST /verify — Client Call
await fetch("/verify", {
    method: "POST",
    headers: { "Content-Type": "application/json" },
    body: JSON.stringify({ token: idToken }),
});
|
Field |
Type |
Description |
|---|---|---|
|
|
|
The ID token returned by MSAL after a successful login popup |
POST /verify — Response (success)
{ "message": "Token verified" }
POST /verify — Response (failure)
|
Status |
Error |
|---|---|
|
|
|
|
|
|
|
|
|
|
|
|
Step 5. Implement /session — Check Auth Status
Where it is used: Call /session in two situations: on every page load to restore the UI state for a returning user, and immediately after a successful /verify call to confirm the session was created and render the welcome message. The endpoint reads the session cookie set by /verify and returns the user's name and email if the session is still valid. Your UI logic should use data.loggedIn to decide whether to show the iFrame stream or the login button.
GET /session — Server Implementation
app.get("/session", (req, res) => {
    const { app_session } = req.cookies;
    if (!app_session) return res.json({ loggedIn: false });
    try {
        const user = jwt.verify(app_session, process.env.JWT_SECRET);
        return res.json({ loggedIn: true, user });
    } catch (err) {
        return res.json({ loggedIn: false });
    }
});
GET /session — Client Call
const res = await fetch("/session");
const data = await res.json();
GET /session — Response (authenticated)
{
  "loggedIn": true,
  "user": {
    "name": "Jane Doe",
    "email": "jane@example.com"
  }
}
GET /session — Response (not authenticated)
{ "loggedIn": false }
Use data.loggedIn to control whether the iFrame stream is shown. If true, set the iFrame src to your stream URL and make it visible. If false, clear the src and hide it.
Note: The session expires after 1 hour. After expiry,
/sessionreturns{ "loggedIn": false }and the user will need to log in again.
Step 6. Implement /logout — Clear Session
Where it is used: Call /logout when the user clicks the Logout button. This endpoint clears the session cookie on the server so the session can no longer be used. After calling it, reset your UI to the logged-out state — hide the iFrame, clear its src, and show the login button again. The pixel stream will stop loading as soon as the src is cleared.
POST /logout — Server Implementation
// Logout endpoint
app.post("/logout", (req, res) => {
    res.clearCookie("app_session", {
        httpOnly: true,
        secure: process.env.NODE_ENV === "production",
        sameSite: "lax",
    });
    res.json({ message: "Logged out" });
});
POST /logout — Client Call
await fetch("/logout", { method: "POST" });
POST /logout — Response
{ "message": "Logged out" }
After this call, a subsequent /session request will return { "loggedIn": false }
API Endpoints Summary
|
Endpoint |
Method |
Purpose |
|---|---|---|
|
|
|
Validates the Microsoft ID token and creates a session cookie |
|
|
|
Returns current login status and user info |
|
|
|
Clears the session cookie and ends the session |
Troubleshooting
|
Issue |
Cause |
Fix |
|---|---|---|
|
Login popup is blocked by the browser |
|
Always trigger |
|
|
The |
Ensure the Microsoft App Registration |
|
|
Token was signed with a key not present in Microsoft JWK keyset |
Token may be malformed or from the wrong tenant; log out and sign in again |
|
Session is lost after page refresh |
Secure cookie flag requires HTTPS, but server is running on HTTP |
Use HTTPS in production environment |
|
iFrame stream restarts every time page is focused |
|
Prevent reassigning: |
|
Logout button visible before login |
Button is not hidden by default in HTML |
Add |
|
MSAL authority mismatch error |
App registration is single-tenant but |
Change authority to |
Need help?
If you need any assistance, feel free to reach out through any of the following channels:
🛠️ Support Portal: Contact Our Support Team
💬 Discord Community (Faster Support): Join Our Discord Community
📧 Email Support: support@eagle3dstreaming.com
Follow us on:
Facebook | GitHub | LinkedIn | YouTube